Wednesday, 28 September 2011

Zoo life with Sophs

Today I went on an impromptu outing to the zoo with Favourite Niece Sophs ...

First we had a wonder round the butterfly house...


Then Sophs and her mum decided to see which animals they could run as fast as ... "1, 2, 4 ... go!!!"


After, we went and made friends with some meerkats doing a pile up ...


... followed by watching some gibbons preening ...


We wondered round a bit more and saw some more lovely fauna ...


Finally Soph decided it was time to drive us home.


What a smashing day!

Sunday, 25 September 2011

Lucky Finds - Carlton Ware guards money boxes part 2

I haven't done one of my "lucky finds" posts in a while so here you have a new one... Remember my Carlton Ware guards money boxes from last year? Well, I did manage to find the other two ... See Mr Policeman and Mr Scotsguard. They look really great all together the four of them.

I had planned to display them in Little Wind's nursery when he arrived - but it was not to be. They still live temporarily on a window sill - but hopefully with all the house re-decorating going on, they will find a good spot to be admired from.

Saturday, 24 September 2011

Dining table love...

I noticed the jumble of stuff on our dining table this morning and had to take a photo ...

In the foreground amassive load of flowers from the Dommake's wedding, in a vintage ceramic jug (the jug is actually from Sunshine's side of the family); a lush bouquet of sunflowers sent to me by the lovely Vicky who I'll be doing an illustration commission for very soon, in my Stig Lindberg designed Bersa jug; more random flowers in one of the vintage clear glass jugs I collected for our wedding at the back; peaking through is my retro Norwegian Cathrineholm enamel bowl filled with fruit; some of the left over apple crumble we made last night using cooking apples from my friend and gym teacher Wendy's tree; "Steve and Rachel", our two potted some-kind-of-mini-palm-that-looks-like-spider-plants-on-sticks (Dragon plants?), inherited from our friends Steve and Rachel when they emigrated to New Zealand (we miss you guys ...); an orchid on the far left that we also inherited from them but that we then managed to get to flower(!) - they never did; a Marks and Spencer's Scottish Shortbread tin I picked up recently - full of delicious shortbread AND with the most lovely vintagey illustrations - can't find who its been illustrated by; and last but not least my super favourite gift from the lovely Lapworths, an Alexander Girard "Mother and Child" tray by Vitra that is so super special that it still lives in its plastic sleeve; ALL on our vintage Ercol dining table set ....LOVE :)

Thursday, 22 September 2011

Caaaaaaaaaaaaape!

On Tuesday I went to a "Learn To Make A Stylish Cycling Cape In A Day" workshop ... it involved sewing a cycling rain shower-proof cape out of ... you guessed it ... a shower curtain! I found the most amazing rainbow shower curtain in BHS ... I don't have decent photos as my camera was on low battery during the day and half way through it ran out of battery completely ...


Took me a day or so more to get all the sewing, buttoning and extra waterproofing done ... but now, here it is ... my Happy Cape!


For someone with limited sewing skills, this was quite the achivement - really inspired to do more sewing now. Also SO love the cape - really looking forward to wearing it cycling round behind Sunshine on the tandem!

Saturday, 17 September 2011

Congratulations The Domakkes!

And what a smashing do it was too ... we were having too much fun to actually take any photos so here are a couple by Sy (I'll upload a few more of our favourites when we get hold of them...)

Sunshine waiting to sign on the wedding certificate as an official witness...

Sunshine and I probably listening to some speeches ...yes, I made an effort to dress up this wedding ...

Friday, 16 September 2011

Setting up for the Dommakes ...

Spent today setting up our friends "The Dommakes" wedding - its going to be FAB :)

Before...

After!

Sunday, 11 September 2011

Yay us!

And not only did we manage to do DIY this weekend .. we also managed to make some apple crumble .... mmmm... so easy to make ...

Freshly baked apple crumble with custard as starter (why wait till dessert???)

And mash ... I
luuuuuurve mash... and vege sausages and onion gravy ...

I'm not sure whats going on with the mash pointy-boobie towers there ...

With work and DIY I tend to end up doing the bulk of the cooking round the house ... this was very much a joint effort though ... I love cooking with Sunshine ... must do more baking!

Hallway Part 9

Wall painting in our house is a surgical operation!!! Hahaha ... actually, I look this ridiculous because we went to the Scrapstore the other day and found lots of rejected medical supplies for sale. Got ourselves latex gloves, some operating sheets (those things you put over the patient when you operate on them... has a hole in the middle which you position over the operation site - they're massive, and are seen here as the big blue sheet on the floor doubling as dust sheet), and some surgical gowns that work fab at keeping the paint off your clothes ...

We've done the first coat of white paint on the upstairs bit of the hall, and also caulk and first coat of paint in the porch bit of the downstairs bit of the hall. The rest of the day we spend tidying the upstairs front room by packing up a lot of the office stuff and moving it downstairs; moving the sofa bed up into there (this room is going to eventually be a guestroom / chilling room); and tyding the DIY stuff out of the rest of the house and into the front lounge. Its so nice to have the house back to being in a bit more of a livable state!

Saturday, 10 September 2011

Hallway Part 8

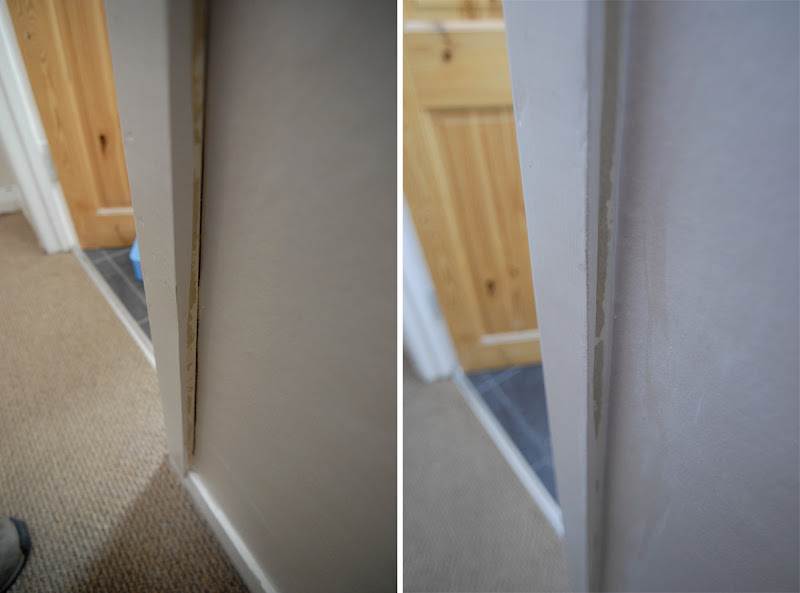
And while Sunshine was downstairs doing the front lounge, I was upstairs 'caulking' any gaps/unfinished edges in the upstairs half of the hall. Caulk is a silicone based sealant - much like the Mastic that you would use in the bathroom. Nicely covers small gaps between walls and skirting boards; walls and door frames; and bits of wallpaper that haven't quite come togther flush. Some of the skirting board and door frame gaps were a bit bigger than the caulk could manage so I had to fill with plaster first, and then caulk over when the plaster was dry...

Picture above is the bathroom doorway - left, with gap - right, caulked. Tommorow ... paint!

Front Lounge Part 9

Not a lot has happened over the week house-wise, but today Sunshine sanded the edges on and put down the rest of the available floorboards and nailed them in. This is what it looks like - notice that a full sand-back and re-stain will be required on the floor; and because we had broken boards and used the ones from the far side (bottom right of picture) of the room to fill in the gaps on the other side of the room, we now have missing boards on this side. We've put a few chipboard widths to cover the major holes but the plan is now to leave this room as is and come back to it at the end.

It is eventually going to become our studio/office. But now it will serve as storage and as a staging post for the rest of the DIY. The current studio/office is in the front room upstairs so we're going to move the office stuff down here, and any other stuff from any other room as and when we need to. We're setting up an area near the door of this room where we can pile all the DIY tools/paints/miscellaneous stuff for easy access (but out of the rest of the house). So no more front lounge updates for a while ...

Tuesday, 6 September 2011

Front Lounge Part 8

So where is this insulation you keep talking about?????
Ahhhhh....

7. Remember yesterday's netting? Well then, you cut your insulation (recycled glass bottles) to the desired width (scissors and/or bread knives work best), and suspend them in your netting "hammocks".

8. Lay over some semi-permeable membrane (draught-excluding but lets moisture get through).

9. And last but not least - top off with floor boards!

And this is what it looks like - all the layers: joist; with netting; with suspended insulation; semi-permeable membrane; floorboard; and foot (as can be seen peeking in on the bottom right).

Our floorboards had shrunk and got quite 'gappy' over the years so we tried to get them as close together as possible. Useful to have a spare piece of 'tounge' board to use to bang all the boards together. We've nailed them down with some oval lost-head nails (that Sunshine's folks seem to have left over - a whole massive tin-full - from a previous house building project!).

We've done the room in two halfs (so we had a solid platform to stand on whilst doing the second half of the room - SO precarious walking on joists and trying to avoid stepping into the insulation/netting as its suspended about 10cm off the concrete subfloor. As you can see we have the insulation down on the other half of the room. By the end of the day we had the membrane and floorboards down too. Just got too late to nail them down (don't want to annoy the neighbours at all hours!). Sunshine took the day off work today - that's why we managed such a lot. Think the last of this will have to wait till the weekend when he's about again.

Monday, 5 September 2011

Front Lounge Part 7

Even more things to do before insulating underfloor:

5. Secure loose pipes to joists with gaffer tape.

6. Lay down garden netting and staple into the joists creating a net "hammock" ... I can't begin to describe how annoying using a staple gun, on netting, on vertical surfaces is ... aaaarrrggghhhh ..!!!! Why not staple on top, you say? Leaves big lumpy metal things where the floorboards are going. What is the netting for in the first place? Come back tomorrow and find out!

* Netting doesn't take the
whole day to do - but Sunshine was at work today so we could only do this in the evening when he came back ...

Sunday, 4 September 2011

Front Lounge Part 6

More things to do before insulating underfloor:

3. Check all floorboards are OK - glue broken tongues/grooves/bits-of-board as necessary; and sand down where needed. Notice blue tape and clamps - that's floorboard-repair for you.

4. Lay them all down to make sure it all fits together and assess what needs replacing due to getting broken when being taken out. Pre-insulation pre-prepping is key!

Saturday, 3 September 2011

Front Lounge Part 5

Things to do before insulating underfloor:

1. Check joists are level. Even more fun with a Laser leveler.

2. Insulate radiator plumbing.

Friday, 2 September 2011

Hallway Part 7

So now we've now lining-papered the bulk of the hall - only a few bits left (where the exposed wires need re-plastering into the wall; where we have yet to box in the utility meters; and a bit of downstairs ceiling). Still have to cleanup all the skirting boards and other woodwork - doorframes etc.; caulk (don't know what this is about but apparently its like using mastic in the bathroom); change all the old light switches/plug sockets; and PAINT!

Leaving the hallway for a bit to get back to the front room floor.